
Rails 4 2 Cheatsheet for Rails Newbies
2015-02-01This is a cheatseet written by a Newbie (I am currently enrolled with Tealeaf Academy) primarily as a reference for myself, but hopefully it can be helpful to other newbies as well. If you would like to correct me on anything or ask for clarification please reach out to me on Twitter - @rickpeyton.
This cheatsheet assumes your project has already been created. Check out Starting a New Rails Project with Git rbenv and Heroku if you need help getting your app setup.
The Rails Philosophy
- Don't Repeat Yourself: DRY is a principle of software development which states that "Every piece of knowledge must have a single, unambiguous, authoritative representation within a system." By not writing the same information over and over again, our code is more maintainable, more extensible, and less buggy.
- Convention Over Configuration: Rails has opinions about the best way to do many things in a web application, and defaults to this set of conventions, rather than require that you specify every minutiae through endless configuration files.
config/routes.rb
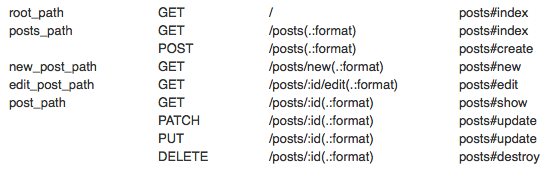
A resource is the term used for a collection of similar objects, such as articles, people or animals. You can create, read, update and destroy items for a resource (CRUD).
You declare your resources in your /config/routes.rb file by using resources
resources :posts
That will create all 7 actions for your post resource.
- index
- show
- new
- edit
- create
- update
- destroy
While you may use any order, the convention is that you will define the actions in your Controller in the above order.
But you should only create the resources you actually intend to use. You can control that like this
resources :posts, except: [:destroy]
# or
resources :posts, only: [:index, :show, :new, :edit, :create, :update]
You can also nest routes to keep your URLs clean
resources :posts, except: [:destroy] do
  resources :comments, only: [:create]
end
With your serving running in developement mode you can view all of the available routes in your app by visiting http://localhost:3000/rails/info/routes
Model Layer and Database
Create a Model
Models in Rails use a singular name and their corresponding database tables use a plural name.
- Model = Person, Table = people
- Model = Category, Table = categories
- Model = UserGroup, Table = user_groups
If you are unsure what the corresponding table name should be you can go into Rails Console (rails c from terminal) and use the tableize method.
> 'Person'.tableize
=> "people"
A mistake that got me was not understanding that your Model class name needs to be singular and CamelCase, but your model filename needs to be snake_case and singular.
class PostCategory...
...needs to be defined inside the filename post_category.rb
Rails provides a generator for creating migrations, which is probably the only generator you should ever use. To create the new migration that will create a new articles table for Article, run this command in your terminal:
rails generate migration CreateArticle title:string description:text
# Can be shortened as
rails g migration CreateArticle title:string description:text
This will create a migration file
db/migrate/20150201213557_create_article.rb
With the following contents
class CreateArticle < ActiveRecord::Migration
  def change
    create_table :articles do |t|
      t.string :title
      t.text :description
    end
  end
end
And you can run that migration with
rake db:migrate
# if that throws an error you might need to use
bundle exec rake db:migrate
Sometimes you will need to edit an already existing table as well. You can generate a migration for that too.
rails g migration AddTagToArticle tag:string
That gives us db/migrate/20150201214457_add_tag_to_article.rb
class AddTagToArticle < ActiveRecord::Migration
  def change
    add_column :articles, :tag, :string
  end
end
And again you can run that migration with
rake db:migrate
# if that throws an error you might need to use
bundle exec rake db:migrate
Reference Creating a Migration for more options.
The Migration change method supports these definitions
- add_column
- add_index
- add_reference
- add_timestamps
- add_foreign_key
- create_table
- create_join_table
- drop_table # requires a block
- drop_join_table # also requires a block
- remove_timestamps
- rename_column
- rename_index
- remove_reference
- rename_table
After you create your migration go ahead and setup the model
class Article < ActiveRecord::Base
end
It is also a good idea to jump in to Rails Console (rails c from terminal) and test your new ActiveRecord relationship
article = Article.create(title: 'Title test', description: 'Description test')
article.title
article.description
If you want to drop all of your fake data after you are done testing you can reset the database from terminal
rake db:reset
# or if you get an error
bundle exec rake db:reset
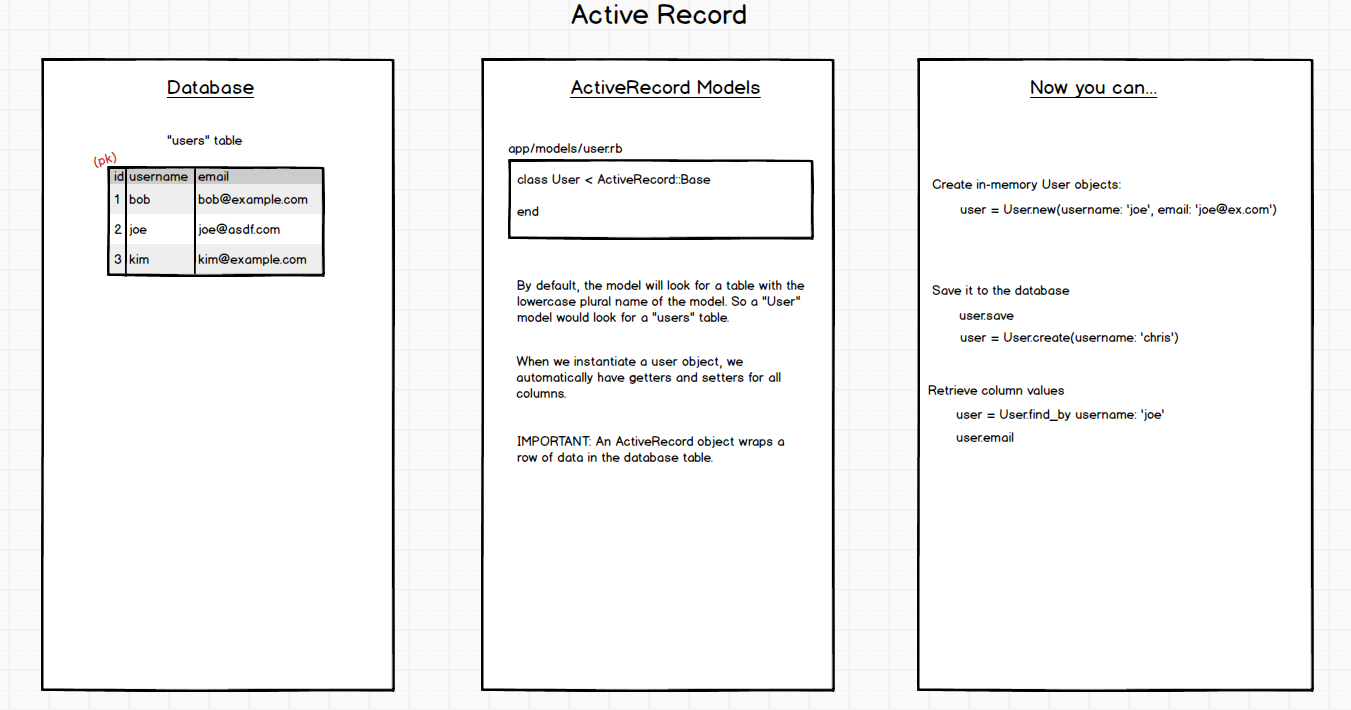
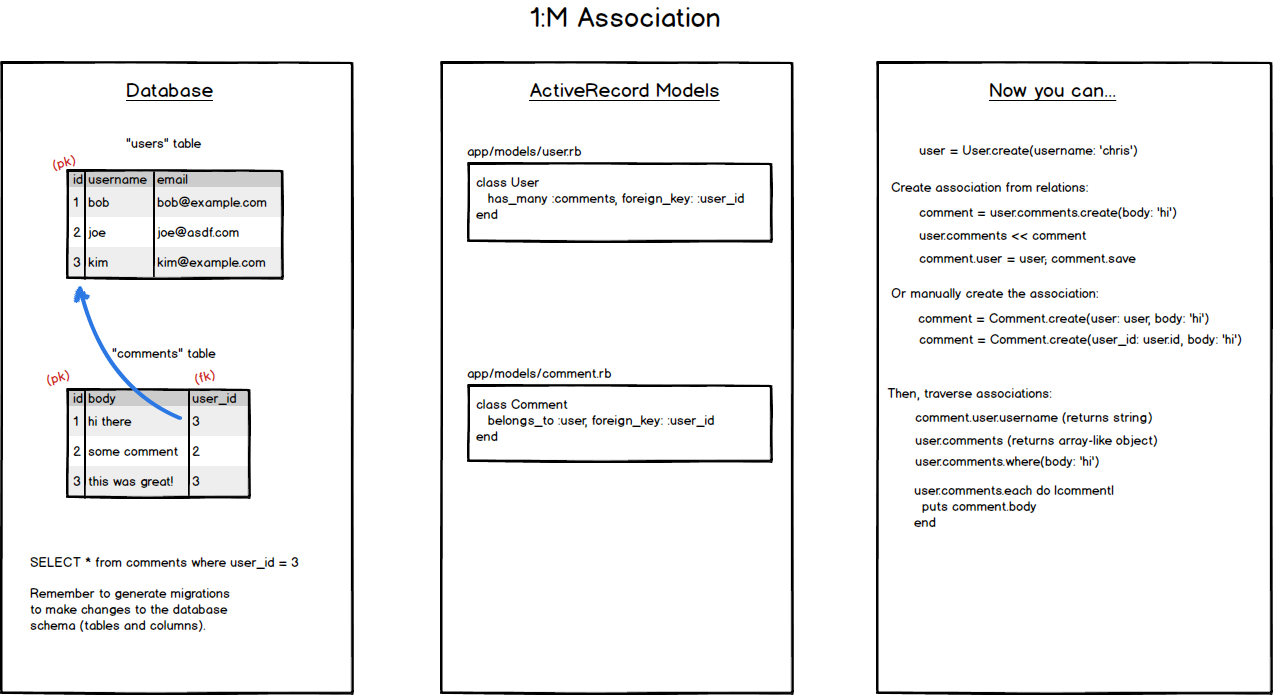
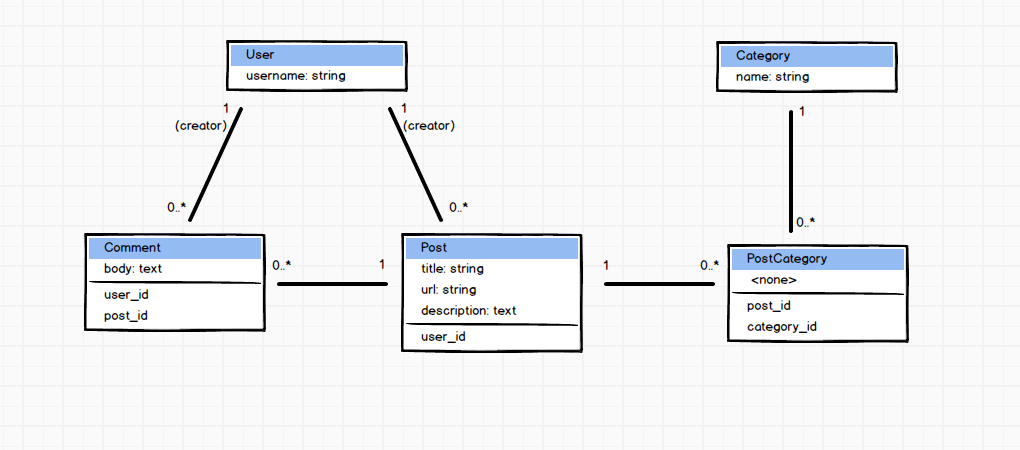
Active Record Associations
Great visuals of Active Record associations that I received during my lesson at Tealeaf Academy
- Active Record Basics
- 1 to Many Associations
- Many to Many Associations
- A sample Entity-Relationship Diagram
- A Model-View-Controller Visual
Active Record associations let you easily create relationships between two models (and the database). In the case of comments and articles, you could write out the relationships like this (this is also an example of a One to Many Relationship)
class Comment
  belongs_to :article
end

class Article
  has_many :comments
end
Now if you have an instance variable @article you can retrieve an array of all comments belonging to that article with
@article = Article.first
@article.comments
You can also use that instance variable to create and save a new comment and automatically associate it with the article.
@article.comments.create(body: 'some comment')
You can also override the default association. You may want to reference your comments table as opinions instead.
class Article
  has_many :opinions, class_name: 'Comment'
end
And now you would access the comments table through opinions
@article.opinions
You could do the same thing by calling articles posts. But this time you would need to tell the Model where to find the foreign key as well.
class Comment
  belongs_to :post, foreign_key: 'article_id', class_name: 'Article'
end
Many to Many Relationships
A many to many relationship at the database level requires a join table to associate the two tables together. For example you may have a posts table and a tags table. Posts can have many tags and tags can have many posts so you would need a join table named post_tags that would contain a post_id and a tag_id in each row.
The two options for Many to Many Relationships are has_many through: and has_and_belongs_to_many. has_and_belongs_to_many is the more simple of the two as it allows you to setup the association without manually setting up the join method and table. But the advantage of using has_many through: is that you can add extra attributes to the join method besides the two keys. It is the more flexible option.
Screenshot from the rails guides
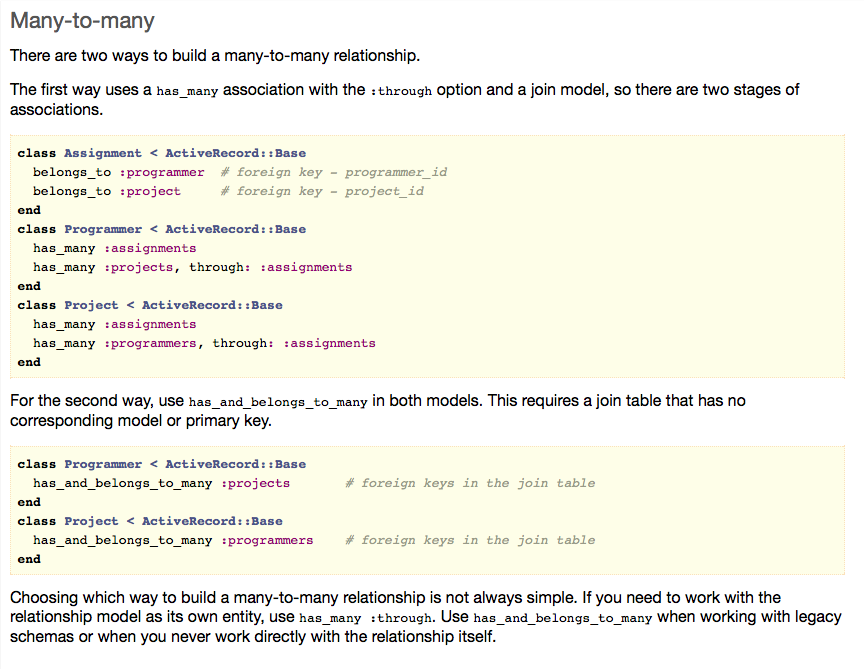
Here is an example of a has_many through: relationship
We will need to setup a UserGroup model with a table user_groups that belongs to User and belongs to Group. Our classes will look like this
class User < ActiveRecord::Base
  has_many :user_groups
  has_many :groups, through: :user_groups
end

class Group < ActiveRecord::Base
  has_many :user_groups
  has_many :users, through: :user_groups
end

class UserGroup < ActiveRecord::Base
  belongs_to :user
  belongs_to :group
end
Note that User and Group required that has_many :user_groups be declared prior to adding the has_many through: declaration.
Common belongs_to and has_many methods
I pulled this example directly from the Rails Guides
class Project < ActiveRecord::Base
  belongs_to :portfolio
  has_many :milestones
end
So a Project belongs to a specific portfolio and will have several milestones. Here are some methods that these relationships will make available to you.
# the belongs_to relationship
project = Project.first
project.portfolio # returns a portfolio object
project.portfolio = portfolio # this will grab the portfolio's id and assign it to the foreign_key
project.portfolio.nil? # does this project have a portfolio?
# the has_many relationship
project.milestones.empty? # Does it have any milestones?
project.milestones.size # how many milestones does it have?
project.milestones # return all of the milestones
project.milestones << milestone # assign milestone to this project and assign the project id to it.
project.milestones.delete(milestone) # remove an association with this project
project.milestones.destroy(milestone) # remove the milestone from the database
project.milestones.find(milestone_id) # find a specific milestone
project.milestones.create # create a new milestone that will be associated with this project
Screenshot of more belongs_to and has_many relationships
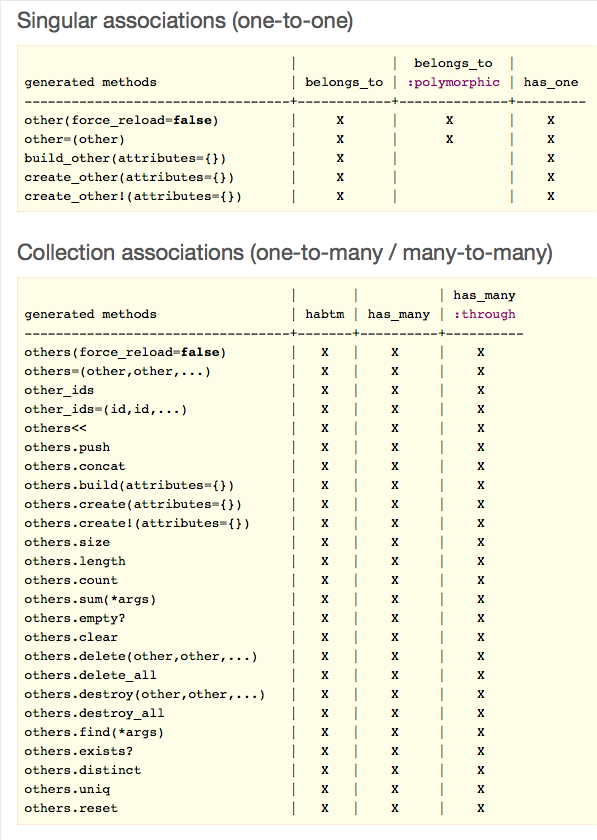
Also note that the methods use caching unless specifically instructed not to, to help with performance.
project.milestones # fetches from the database
project.milestones.size # uses milestones cache
project.milestones(true).size # fetches from the database
project.milestones # fetches from the cache this time
Virtual Attributes
Active record also sets up virtual attribtues for each object allowing you easy access to the column data. You might have a User model that accesses a users table that contains username, name and join_date. Virtual attributes will allow you to access that data with the following syntax
@user = User.find.first
@user.username
@user.name
@user.join_date
Retrieving Objects from the Database
I don't have much experience here, but this is the reference I will be using.
Optimizing Database Queries in Rails
I am not here yet either, but I am preseving this space to explore this further down the road. For now I captured this screenshot from the rails guides.
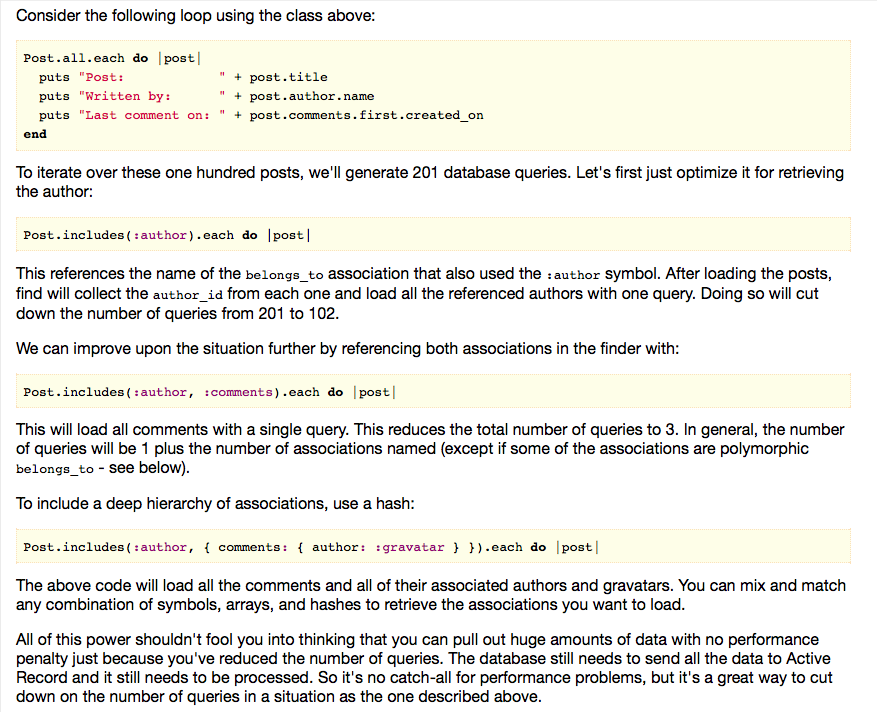
Mass Assignment
Mass assignment allows us to set a bunch of object attributes at once through a hash of key:value pairs. Mass assignment allows us to do
post = Post.create(title: 'my awesome post', description: 'with an awesome description', user_id: 3)
Instead of
post.title = 'my awesome post'
post.description = 'with an awesome description'
post.user_id = 3
post.save
Validate Data Being Sent to the Models
The following methods trigger validations, and will save the object to the database only if the object is valid:
- create
- create!
- save
- save!
- update
- update!
From the Rails Guide
class Person < ActiveRecord::Base
  validates :name, presence: true
end

Person.create(name: "John Doe").valid? # => true
Person.create(name: nil).valid? # => false
Reference the Rails Guide for a full list of Validation Helpers
Rails supports these basic data types
- :string
- :text
- :integer
- :float
- :decimal
- :datetime
- :timestamp
- :time
- :date
- :binary
- :boolean
I will primarily be using Postgres since I will be deploying to Heroku and so I still need further research here on how Postgres specifically interprets these data types.
Foreign Keys
You establish relationships between tables through the use of foreign keys. A foreign key in a database row represents a primary key on another row in a different table and establishes a connection between the two tables and rows.
Because it can be extremely annoying to split exiting data into smaller pieces I have seen it recommended that you err on the side of breaking things apart as much as possible when starting out (example is taking a street number, street name and suite separately rather than combining those into one field).
Controllers
Controllers will define the methods for your resources
- index
- show
- new
- edit
- create
- update
- destroy
While you may use any order, the convention is that you will define the actions in your Controller in the above order.
I still have a long way to go on Controllers, but here is what I've got so far.
Errors, Render and Redirection
We can check for errors and use an if statement to handle directing us to the appropriate view.
Rails automatically wraps fields that contain an error with a div with class field_with_errors. You can define a css rule to make them standout.
def create
  @article = Article.new(article_params)
  if @article.save
    redirect_to @article
  else
    render 'new'
  end
end
Strong Parameters
from Rails Guides Rails requires us to tell Rails exactly which parameters are allowed into our controller actions. Why? The ability to grab and automatically assign all controller parameters to your model in one shot makes the programmer's job easier, but has a cost. What if a request to the server was crafted to look like a new article form submit but also included extra fields with values that violated your applications integrity? They would be 'mass assigned' into your model and then into the database along with the good stuff - potentially breaking your application or worse.
# Never trust parameters from the scary internet, only allow the white list through.
def create
  @user = User.new(user_params)
end

private

def user_params
  params.require(:user).permit(:name, :email)
end
Views
Linking and Paths
<%= link_to 'My Blog', controller: 'articles' %>
The link_to method is one of Rails' built-in view helpers. It creates a hyperlink based on text to display and where to go - in this case, to the path for articles.
If you want to link to an action in the same controller, you don't need to specify the :controller option, as Rails will use the current controller by default.
Here is another example that is linking to the create path for article
<%= link_to 'New article', new_article_path %>
Partials
By convention, partial files are prefixed with an underscore. Consider
app/views/shared/contenttitle.html.erb
<p class='lead'>
  <%= title %>
  <hr />
</p>
Here we can use render in another template app/views/posts/index.html.erb
# Note that content_title does not have the _ prefix in this path)
<%= render 'shared/content_title', title: 'All Posts' %>
Because index.html.erb and contenttitle.html.erb are not in the same directory we need to specify the path of the contenttitle.html.erb file
Helpers can also automatically perform iteration which allows cool stuff like
app/views/categories/_category.html.erb
<span class='badge'><%= category.name %></span>
app/views/posts/index.html.erb
<% @posts.each do |post| %>
  <div class='row'>
    <div class='span8 well'>
      <%= render post.categories %>
Forms
When you call form_for, you pass it an identifying object for this form. In this case, it's the symbol :article. This tells the form_for helper what this form is for. Inside the block for this method, the FormBuilder object - represented by f - is used to build two labels and two text fields, one each for the title and text of an article. Finally, a call to submit on the f object will create a submit button for the form.
The form needs to use a different URL in order to go somewhere else. This can be done with the :url option of form_for. Typically in Rails, the action that is used for new form submissions like this is called "create", and so the form should be pointed to that action.
<%= form_for :article, url: articles_path do |f| %>
    <%= f.label :title %><br>
    <%= f.text_field :title %>

    <%= f.label :text %><br>
    <%= f.text_area :text %>

    <%= f.submit %>
<% end %>
The first parameter of form_for can be an object, @article, which would cause the helper to fill in the form with the fields of the object. Passing in a symbol (:article) with the same name as the instance variable (@article) also automagically leads to the same behavior.
When a form is submitted, the fields of the form are sent to Rails as parameters. These parameters can then be referenced inside the controller actions, typically to perform a particular task.
To see what these parameters look like, change the create action to this:
def create
  render plain: params[:article].inspect
end